Capacitor Plugin for Text Detection Part 6 : Highlight text detections
This is part 6/6 of the "Capacitor Plugin for Text Detection" series.
At this point, we have both android and iOS plugins in place and ready to use. In this post, let's flesh out our sample app, ImageReader to use the result from the plugins to obtain and highlight text regions on the image.
Flesh out ImageReader
Open ImageReader/src/app/home/home.ts.
In a previous post, we left off here where we just got the results back from the plugin and console logged it like this.
this.textDetections = await td.detectText(imageFile.path!);
console.log(this.textDetections);
In this post, using the results from our plugins, let's highlight text locations on the image and allow them to be clickable to obtain the text.
First, instead of triggering onInit, let's add a button that'll prompt the user to pick an image. In home.page.html, add
<ion-item lines="none">
  <ion-button (click)="detectTextInImage()">Pick a Picture</ion-button>
</ion-item>
Then, add an svg object with an image, that will point to the image that the user picks from the phone gallery
<div *ngIf="imageFile?.webPath">
  <ion-item *ngIf="text">
    <ion-label position="stacked">Clicked Text: </ion-label>
    <ion-text>{{text}}</ion-text>
  </ion-item>

  <div *ngIf="platform.is('android')">
    <svg #svgContainer [attr.width.px]="scaleX" [attr.height.px]="scaleY">
      <image [attr.xlink:href]="imageFile.webPath" [attr.width]="scaleX" [attr.height]="scaleY"></image>
    </svg>
  </div>
</div>
In home.page.ts, move the text detection code from ngOnInit to a function named detectTextInImage to work with the button we just created. Note that in addition, I'm using the width and height properties of CameraOptions. This will help us with the scaling and coordinate transforms that'll follow.
async detectTextInImage() {
  const loader = await this.loadingController.create({
    message: 'Processing Image...',
  })

  // Using the capacitor Plugin Camera to choose a picture from the device's 'Photos'
  Camera.getPhoto({
    resultType: CameraResultType.Uri,
    source: CameraSource.Photos,
    width: this.scaleX,
    height: this.scaleY,
  }).then(async imageFile => {
    this.imageFile = imageFile;
    const td = new TextDetector();

    this.textDetections = await td.detectText(imageFile.path!, this.orientation);
    this.drawTextLocationsOnImage();
  }).catch(error => console.error(error))
}
Optionally, if you want to pass in orientation as well, this is how we do it
this.orientation = ImageOrientation.Right;
// orientation here is not the current orientation of the image, but the direction in which the image should be turned to make it upright
this.rotation = Rotation[this.orientation];
this.textDetections = await td.detectText(imageFile.path!, this.orientation);
Now, let's create drawTextLocationsOnImage() to add text highlighting on the image. Here I'm looping through the results and drawing polygons with the coordinates. We are receiving normalized coordinates from our plugins, whose origin is bottom-left, i.e, our coordinates are in the first quadrant. SVG assumes top-left as the origin by default. So we have 2 steps to do before we can use our coordinates to highlight text blocks on the image:
- De-normalize the coordinates based on the image width and height you choose.
scaleXandscaleYis the width and height of my image here. - Mirror the coordinates from 1st quadrant into 4th quadrant by subtracting from the height of the image
scaleY. We don't have to transform the x-coordinate because it remains unaltered in the 1st and 4th quadrants.
drawTextLocationsOnImage() {
  const svgContainer = this.svgContainer.nativeElement;

  this.textDetections.forEach((detection: TextDetection) => {
    let points = '';
    const coordinates = [detection.bottomLeft, detection.bottomRight, detection.topRight, detection.topLeft];

    // the received coordinates are normalized, proportionate to the width and height of the image itself. Hence here, x coordinate is multiplied by image width(scaleX), and y with height(scaleY) to obtain de-normalized coordinates for the chosen image scale. In addition to de-normalizing, subtracting from scaleY because cap-ml assumes bottom-left as origin (0,0) vs SVG rect which assumes top-left as origin (0,0)
    coordinates.forEach(coordinate => {
      points = points + coordinate[0]*this.scaleX + ' ' + (this.scaleY - (coordinate[1]*this.scaleY)) + ',';
    })
    points = points.slice(0, -1);  // removing the last comma

    let polygon = document.createElementNS('http://www.w3.org/2000/svg', 'polygon');
    polygon.setAttribute("fill", "#000");
    polygon.setAttribute("stroke", "#000")
    polygon.setAttribute('opacity', '0.4')
    polygon.setAttribute('points', points);
    polygon.onclick = () => this.text = detection.text;
    svgContainer.appendChild(polygon);
  })
}
Note that we used a type TextDetection in the code above. Earlier, we discussed that our textDetections result would be an array of TextDetections, each one containing the text and its bounding coordinates. Let's add an interface for TextDetection like this.
export interface TextDetection {
  bottomLeft: [number, number]; // [x-coordinate, y-coordinate]
  bottomRight: [number, number]; // [x-coordinate, y-coordinate]
  topLeft: [number, number]; // [x-coordinate, y-coordinate]
  topRight: [number, number]; // [x-coordinate, y-coordinate]
  text: string;
}
Here is the complete implementation of home.page.ts
export class HomePage implements OnInit {
  @ViewChild('svgContainer', { static: false})
  svgContainer: ElementRef<SVGElement>;

  private imageFile?: CameraPhoto;
  private textDetections: TextDetection[];
  private text: string;
  private orientation: ImageOrientation;
  private rotation = 0;
  private scaleX = 300;
  private scaleY = 300;

  constructor(private loadingController: LoadingController, private platform: Platform) {}

  ngOnInit() {
  }

  async detectTextInImage() {
    const loader = await this.loadingController.create({
      message: 'Processing Image...',
    })

    // Using the capacitor Plugin Camera to choose a picture from the device's 'Photos'
    Camera.getPhoto({
      resultType: CameraResultType.Uri,
      source: CameraSource.Photos,
      width: this.scaleX,
      height: this.scaleY,
    }).then(async imageFile => {
      this.imageFile = imageFile;
      const td = new TextDetector();

      loader.present()
      // detectText(filePath, orientation?)
      // orientation here is not the current orientation of the image, but the direction in which the image should be turned to make it upright
      this.orientation = ImageOrientation.Right;
      this.rotation = Rotation[this.orientation];
      this.textDetections = await td.detectText(imageFile.path!, this.orientation);
      this.drawTextLocationsOnImage();
      loader.dismiss()
    }).catch(error => console.error(error))
  }

  drawTextLocationsOnImage() {
    const svgContainer = this.svgContainer.nativeElement;
    this.clearPrevDetections(svgContainer);
    this.textDetections.forEach((detection: TextDetection) => {
      let points = '';
      const coordinates = [detection.bottomLeft, detection.bottomRight, detection.topRight, detection.topLeft];

      // the received coordinates are normalized, proportionate to the width and height of the image itself. Hence here, x coordinate is multiplied by image width(scaleX), and y with height(scaleY) to obtain de-normalized coordinates for the chosen image scale. In addition to de-normalizing, subtracting from scaleY because cap-ml assumes bottom-left as origin (0,0) vs SVG rect which assumes top-left as origin (0,0)
      coordinates.forEach(coordinate => {
        points = points + coordinate[0]*this.scaleX + ' ' + (this.scaleY - (coordinate[1]*this.scaleY)) + ',';
      })
      points = points.slice(0, -1);  // removing the last comma

      let polygon = document.createElementNS('http://www.w3.org/2000/svg', 'polygon');
      polygon.setAttribute("fill", "#000");
      polygon.setAttribute("stroke", "#000")
      polygon.setAttribute('opacity', '0.4')
      polygon.setAttribute('points', points);
      polygon.onclick = () => this.text = detection.text;
      svgContainer.appendChild(polygon);
    })
  }

  clearPrevDetections(svgContainer: SVGElement) {
    while (svgContainer.childNodes.length > 1) {
      svgContainer.removeChild(svgContainer.lastChild);
    }
  }
}

enum Rotation {
  UP = 0,
  DOWN = 180,
  LEFT = 270,
  RIGHT = 90,
}
and home.page.html
<ion-header [translucent]="true">
  <ion-toolbar>
    <ion-title>
      Text Detection Sample App
    </ion-title>
  </ion-toolbar>
</ion-header>

<ion-content [fullscreen]="true">
  <ion-item lines="none">
    <ion-button (click)="detectTextInImage()">Pick a Picture</ion-button>
  </ion-item>

  <div *ngIf="imageFile?.webPath">
    <ion-item *ngIf="text">
      <ion-label position="stacked">Clicked Text: </ion-label>
      <ion-text>{{text}}</ion-text>
    </ion-item>

    <svg #svgContainer [attr.width.px]="scaleX" [attr.height.px]="scaleY">
      <image [attr.xlink:href]="imageFile.webPath" [attr.width]="scaleX" [attr.height]="scaleY" [attr.transform]="'rotate('+rotation+' '+scaleX/2+' '+scaleY/2+')'"></image>
    </svg>
  </div>
</ion-content>
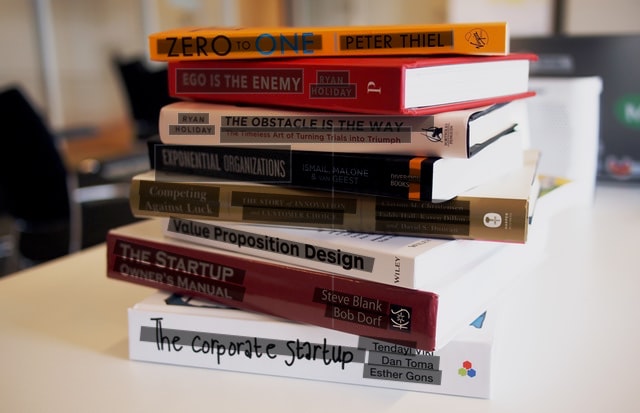
To copy over the changes from the ionic code above into our native iOS/android apps, do npm run build && npx cap sync. Once this is complete, either open up Android Studio (npx cap open android) or XCode (npx cap open ios) and run the app on a device/emulator. I took a picture of a book I had by my side and here is the result. Both frameworks, rather both plugins produced similar results.

More Observations
Here are some of my observations regarding how MLKit and CoreML handle skewed text and rotated text in Images.
Rotated Text

Note that in MLKit, there's a little bit of clutter around skewed text. This is because while CoreML has the option to get the result with highest confidence, confidence is available on MLKit for cloud recognizers only. Hence all potential results are spewed out by MLKit when using the offline version. For example - CoreML detected it as 'Rotated Text' while MLKit detected 'Rotated Text', 'R', 'otated' and 'tex'.
Also, past a certain point (~ more than 45 degrees), both frameworks fail unless proper image orientation is passed in. Both versions of the plugin support orientation at this point, but coreML worked out of the box, while MLKit needed some workarounds.
Skewed Text

CoreML definitely did much better than MLKit here.
So, a compatibility chart for the plugin we created here would look something like this
| Feature | iOS (CoreML Vision) | android (MLKit Vision) |
|---|---|---|
| Text Detection with Still Images | Yes | Yes |
| Detects lines of text | Yes | Yes |
| Bounding Coordinates for Text | Yes | Yes |
| Image Orientation | Yes (Up, Left, Right, Down) | Yes (Up, Left, Right, Down) |
| Skewed Text | Yes | Unreliable |
| Rotated Text | Yes | Yes (with noise) |
That concludes our "Capacitor Plugin for Text Detection" series. Hope you found it helpful.