Capacitor Plugin for Text Detection Part 5 : Android Plugin

This is part 5/6 of the "Capacitor Plugin for Text Detection" series.
In the previous post, we walked through how to use our plugin in the sample app, ImageReader. In this post, let's dive into developing our android plugin.
Android Plugin
To use MLKit, we need to add Firebase using the Firebase console. In order to use Firebase, we need to make sure that our project meets these requirements
-
Uses Gradle 4.1 or later.
-
Use JetPack (AndroidX), which means
- com.android.tools.build:gradle v3.2.1 or later
- compileSdkVersion 28 or later
You can verify the versions easily by Selecting File > Project Structure from the Android Studio menu bar.
Let's dive into the plugin development.
Step - 1: Register the Plugin
(Skip if you already did this in the first post)
Since we handled all the client side code in the previous post, here we can focus on the android plugin. I'm using Firebase's MLKit to detect text in still images.
From the ImageReader directory, open the android project in Android Studio with npx cap open android.
Open app/java/package-name/MainActivity.java, in my case, app/java/com.bendyworks.CapML.ImageReader/MainActivity.java.
In Android, we need do an additional step to register our plugin. In MainActivity.java
- import the plugin class -
import com.bendyworks.capML.CapML; - Inside onCreate -> init, register the plugin -
add(CapML.class)
This file can now be closed, we won't use it anywhere else.
Step - 2: Add Firebase to the Project
Add firebase to the project to access MLKit's text detection.
-
Sign in to your console.firebase.google.com
-
Add Project
- Create a project with a name of your choice. I named it
CapML. - With the project, create an app,
ImageReader(Note: When creating the app, make sure the package exactly matches what you have inapp/AndroidManifest.xml. In my case it'scom.bendyworks.CapML.ImageReader.) - Download
google-services.jsonand place it in the app directory - Follow the firebase leads to make updates to gradle files. I'm also noting the changes in
build.gradlefiles here.
- Create a project with a name of your choice. I named it
If you're using Android Studio, it'll list all the gradle files conveniently under Gradle Scripts section. Beside each file, you'll also see which module the file belongs to. That will be handy when we're making changes to various build.gradle files here
Your project-level build.gradle - build.gradle (Project: android) looks like this
  buildscript {
    repositories {
          google()
          jcenter()
      }
      dependencies {
          classpath 'com.android.tools.build:gradle:3.6.1'
          classpath 'com.google.gms:google-services:4.3.3'
      }
  }

  allprojects {
      repositories {
          google()
          jcenter()
      }
  }
  ...
Make sure you app's build.gradle - build.gradle (Module: app) has the google-services plugin and firebase dependencies like this (This file will make use the google-services.json you just downloaded, so make sure it's in the same directory)
...
apply plugin: 'com.google.gms.google-services'
...

dependencies {
  ...
  implementation 'com.google.firebase:firebase-analytics:17.2.3' // if you enabled firebase analytics while adding firebase to the project.
  implementation 'com.google.firebase:firebase-ml-vision:24.0.1' // for text detection
}

apply from: 'capacitor.build.gradle'

try {
    def servicesJSON = file('google-services.json')
    if (servicesJSON.text) {
        apply plugin: 'com.google.gms.google-services'
    }
} catch(Exception e) {
    logger.warn("google-services.json not found, google-services plugin not applied. Push Notifications won't work")
}
Since we are using the on-device API, configure your app to automatically download the ML model to the device when your app is first installed from the Play Store. In your app's AndroidManifest.xml, add the following meta-data entry.
<application ...>
...
<meta-data
  android:name="com.google.firebase.ml.vision.DEPENDENCIES"
  android:value="ocr" />
</application>
Make sure your plugin's build.gradle - build.gradle (Module: android-cap-ml) also has the google-services plugin and firebase dependencies like this
buildscript {
  repositories {
        jcenter()
        google()
    }
    dependencies {
        classpath 'com.android.tools.build:gradle:3.6.1'
        classpath 'com.google.gms:google-services:4.3.3'
    }
}
...
apply plugin: 'kotlin-android-extensions'
...
repositories {
    google()
...
}

dependencies {
  ...
  implementation 'com.google.firebase:firebase-analytics:17.2.3'
  implementation 'com.google.firebase:firebase-ml-vision:24.0.1'
}
Firebase Setup is done at this point. Let's move on to our plugin code.
Step - 3: Plugin Code
Plugin code will be under android-plugin-name/java/package-name/, android-cap-ml/java/com.bendyworks.capML in my case.
Similar to the ios Plugin, we'll implement the plugin method to send an image to the text detector.
Let's get the filepath and orientation from the capacitor plugin call
String filepath = call.getString("filepath");
if (filepath == null) {
  call.reject("filepath not specified");
  return;
}

String orientation = call.getString("orientation");
Let's write a simple function to convert the orientation we received into rotation like this.
private int orientationToRotation(String orientation) {
  switch (orientation) {
    case "UP":
      return 0;
    case "RIGHT":
      return 90;
    case "DOWN":
      return 180;
    case "LEFT":
      return 270;
    default:
      return 0;
  }
}
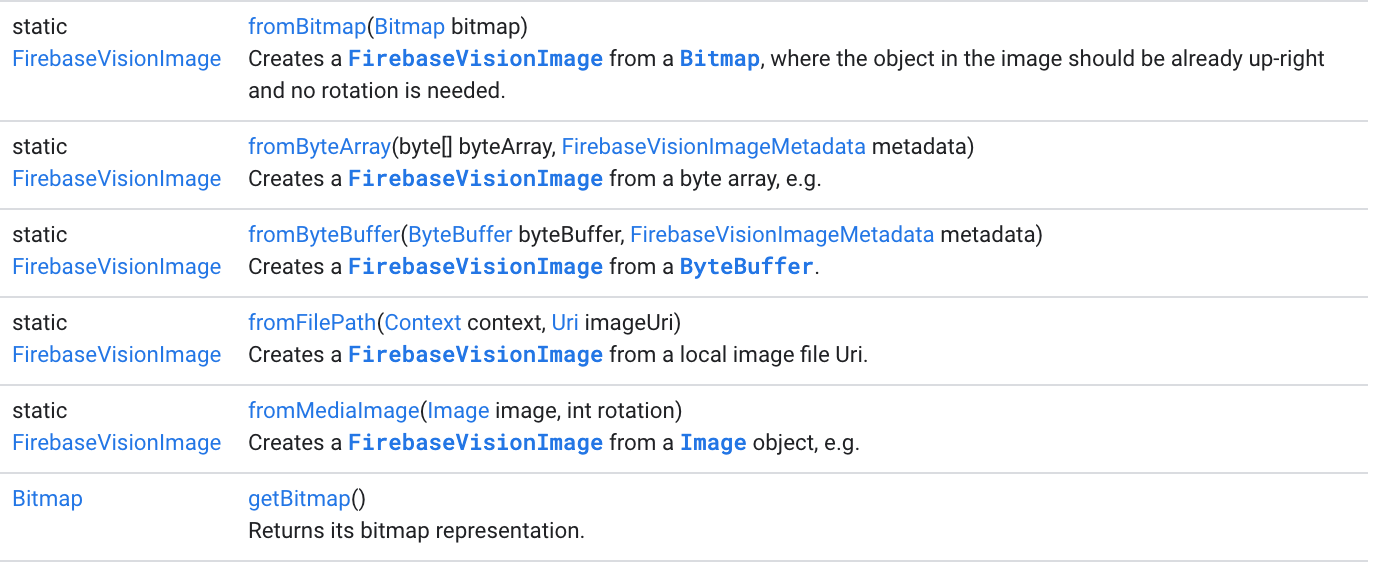
We'll then get the image and preprocess the image to send it to FirebaseVisionImage as a bitmap. We're doing this additional step in Android because, if you notice in the screenshot below, FirebaseVisionImage supports orientation only when created with fromByteArray, fromByteBuffer and fromMediaImage. fromMediaImage might be handy if image is being passed in directly from the camera instead of fetching a picture from the phone's storage, and I had very less luck trying to get it to work with a byteArray or byteBuffer. Since I know that FirebaseVisionImage.fromBitmap expects image in an upright position, I ended pre processing the image, i.e rotated the bitmap before passing it to FirebasVisionImage.

Here is what the pre processing looks like
// Creating a bitmap from the filepath we received from the capacitor plugin call
Bitmap bitmap = MediaStore.Images.Media.getBitmap(this.getContext().getContentResolver(), Uri.parse(filepath));
// converting the orientation we received into rotation that bitmap could use
int rotation = this.orientationToRotation(orientation);
To rotate the bitmap, I'm using matrix rotation
int width = bitmap.getWidth();
int height = bitmap.getHeight();

Matrix matrix = new Matrix();
matrix.setRotate((float)rotation);

//createBitmap(Bitmap source, int x, int y, int width, int height, Matrix m, boolean filter) returns a bitmap from subset of the source bitmap, transformed by the optional matrix.
Bitmap rotatedBitmap = Bitmap.createBitmap(bitmap, 0, 0, width, height, matrix, true);
We're now ready to pass in our image to our Text Detector
TextDetector td = new TextDetector();
td.detectText(call, rotatedBitmap);
Create a new kotlin (or java) file TextDetection.kt which takes in an instance of CAPPluginCall we saw earlier and the bitmap we just created.
Let's start by creating a FirebaseVisionImage that we'll use to perform image processing
class TextDetector {
  fun detectText(call: PluginCall, bitmap: Bitmap) {
    val image: FirebaseVisionImage

  try {
      image = FirebaseVisionImage.fromBitmap(bitmap)
  } catch (e: Exception) {
    e.printStackTrace();
    call.reject(e.localizedMessage, e)
  }
}
Let's create an instance of FirebaseVisionTextRecognizer for performing optical character recognition(OCR) on the FirebaseVisionImage we created above. I'm using onDeviceTextRecognizer but cloudTextRecognizer is an option too.
val textDetector: FirebaseVisionTextRecognizer = FirebaseVision.getInstance().getOnDeviceTextRecognizer();
Process the image. Depending on how much detail we want, we can return from the block level, line level or dig deeper.
textDetector.processImage(image)
  .addOnSuccessListener { detectedBlocks ->
    for (block in detectedBlocks.textBlocks) {
      for (line in block.lines) {

      }
    }
  }
  .addOnFailureListener { e ->
    call.reject("FirebaseVisionTextRecognizer couldn't process the given image", e)
  }
Here I'll get results at the line level to match with how ios Plugin is returning results.
I'm dividing the obtained (x, y) coordinates with the width and height of the image respectively to obtain normalized coordinates. This way, the user who's using the plugin can easily manipulate the image scale without worrying about fixing the coordinates. This step will also make sure that the result we're returning from our android plugin is similar to what ios plugin is returning.
for (line in block.lines) {
  // Gets the four corner points in clockwise direction starting with top-left.
  val cornerPoints = line.cornerPoints ?: throw NoSuchPropertyException("FirebaseVisionTextRecognizer.processImage: could not get bounding coordinates")
  val topLeft = cornerPoints[0]
  val topRight = cornerPoints[1]
  val bottomRight = cornerPoints[2]
  val bottomLeft = cornerPoints[3]

  val textDetection = mapOf(
    // normalizing coordinates
    "topLeft" to listOf<Double?>((topLeft.x).toDouble()/width, (height - topLeft.y).toDouble()/height),
    "topRight" to listOf<Double?>((topRight.x).toDouble()/width, (height - topRight.y).toDouble()/height),
    "bottomLeft" to listOf<Double?>((bottomLeft.x).toDouble()/width, (height - bottomLeft.y).toDouble()/height),
    "bottomRight" to listOf<Double?>((bottomRight.x).toDouble()/width, (height - bottomRight.y).toDouble()/height),
    "text" to line.text
  )
  detectedText.add(textDetection)
}
We can then return the result as a JSObject. Note that we cannot return native data types like ArrayLists or maps directly.
Capacitor's JSObject which extends JSONObject can only take in values of types JSONObject, JSONArray, Strings, Booleans, Integers, Longs, Doubles or NULL (NULL here is an object different from null). Values cannot not be null or of any type not listed above.
For example - call.success(JSObject().put("textDetections", detectedText)) would error out.
call.success(JSObject().put("textDetections", JSONArray(detectedText)))
Here is the complete implementation of TextDetector
class TextDetector {
  fun detectText(call: PluginCall, bitmap: Bitmap) {
    val image: FirebaseVisionImage
    val detectedText = ArrayList<Any>()

    try {
      image = FirebaseVisionImage.fromBitmap(bitmap)
      val width = bitmap.width
      val height = bitmap.height

      val textDetector: FirebaseVisionTextRecognizer = FirebaseVision.getInstance().getOnDeviceTextRecognizer();

      textDetector.processImage(image)
        .addOnSuccessListener { detectedBlocks ->
          for (block in detectedBlocks.textBlocks) {
            for (line in block.lines) {
              // Gets the four corner points in clockwise direction starting with top-left.
              val cornerPoints = line.cornerPoints ?: throw NoSuchPropertyException("FirebaseVisionTextRecognizer.processImage: could not get bounding coordinates")
              val topLeft = cornerPoints[0]
              val topRight = cornerPoints[1]
              val bottomRight = cornerPoints[2]
              val bottomLeft = cornerPoints[3]

              val textDetection = mapOf(
                // normalizing coordinates
                "topLeft" to listOf<Double?>((topLeft.x).toDouble()/width, (height - topLeft.y).toDouble()/height),
                "topRight" to listOf<Double?>((topRight.x).toDouble()/width, (height - topRight.y).toDouble()/height),
                "bottomLeft" to listOf<Double?>((bottomLeft.x).toDouble()/width, (height - bottomLeft.y).toDouble()/height),
                "bottomRight" to listOf<Double?>((bottomRight.x).toDouble()/width, (height - bottomRight.y).toDouble()/height),
                "text" to line.text
              )
              detectedText.add(textDetection)
            }
          }
          call.success(JSObject().put("textDetections", JSONArray(detectedText)))
        }
        .addOnFailureListener { e ->
          call.reject("FirebaseVisionTextRecognizer couldn't process the given image", e)
        }
    } catch (e: Exception) {
      e.printStackTrace();
      call.reject(e.localizedMessage, e)
    }
  }
}
Don't forget to add the required permissions in AndroidManifest.xml. Here we're using Camera plugin to get a picture from the device's storage. So I'm adding these permissions
  <uses-permission android:name="android.permission.INTERNET" />
  <!-- Camera, Photos, input file -->
  <uses-permission android:name="android.permission.READ_EXTERNAL_STORAGE"/>
  <uses-permission android:name="android.permission.WRITE_EXTERNAL_STORAGE" />
  <uses-permission android:name="android.permission.CAMERA" />
That wraps up our android plugin. If you run it and see, results should be very similar to what we saw for the ios Plugin.
Debugging on device or simulator
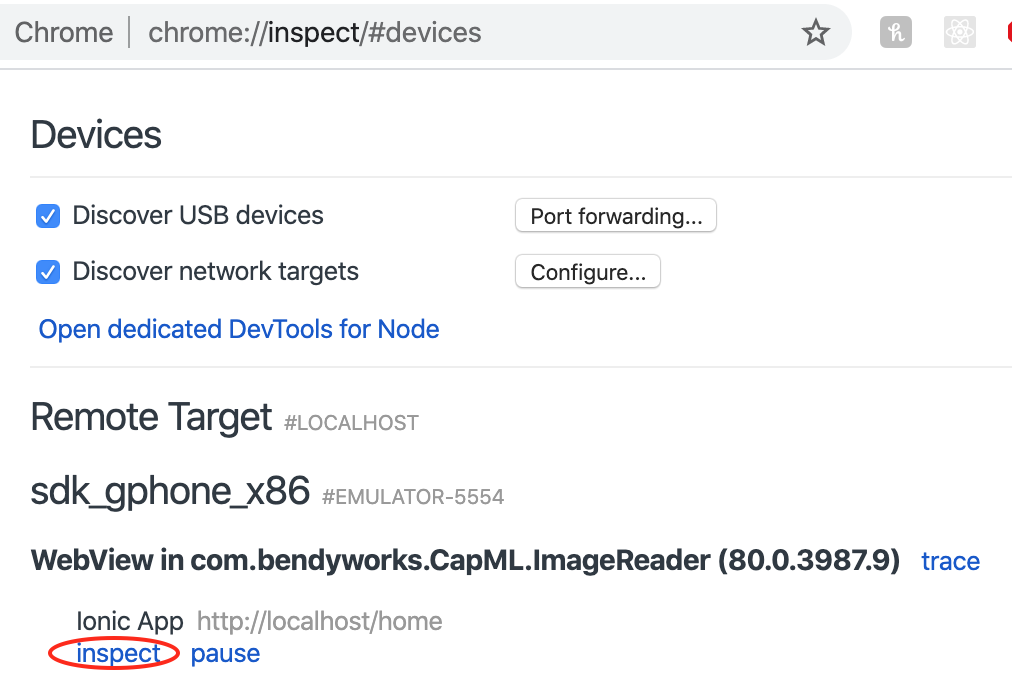
If you need to debug anything on the device/simulator, you can do so using Chrome.
-
In Chrome, open a new tab and go to
chrome://inspect -
Once your opens up on the device/emulator, you'll see your app listed there along with an
inspectlink
Now that both iOS and android plugins are ready, in the next post, we'll flesh out our sample app ImageReader.